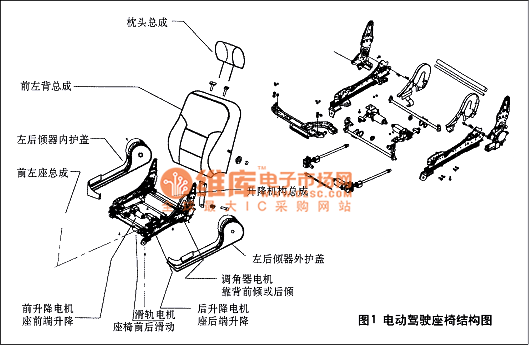
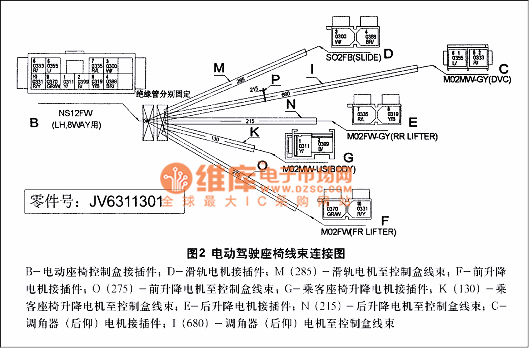
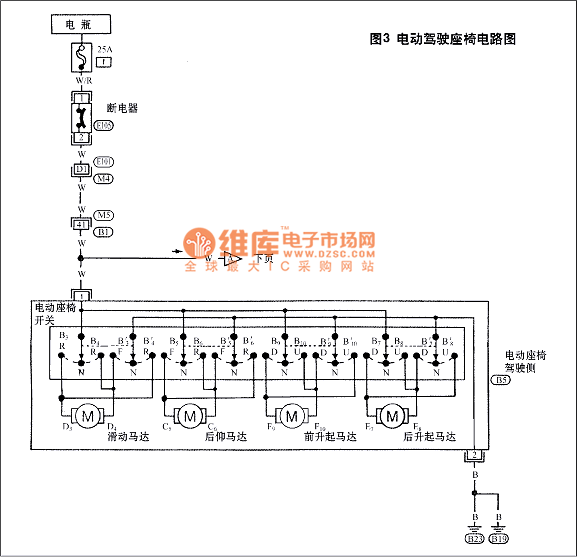
The 04 new Bluebird (NISSAN) sedan is equipped with an eight-way electric driver's seat. Its structure is shown in Figure 1. The circuit harness and connector are shown in Figure 2. The circuit diagram is shown in Figure 3.


Motor circuit introduction
The sliding motor, like other motors, is a two-way motor that rotates forward and backward, controlled by a control box, to move the seat forward or backward.
1, the power seat forward
Press the control box switch, N and F are in contact, the power seat moves forward, and the circuit at this time is:
Battery positive - insurance (25A) - breaker (E105) - contacts (M4, M5) - control box terminals "1, B3" - sliding motor terminals "D3" (in), "D4" (out) - control box touch Point "B3", "2" - ground "B23" - battery negative
2, the power seat is backward
Press the control box switch, N and R are in contact, and the power seat moves backward. The circuit at this time is:
Battery positive - insurance (25A) - breaker (E105) - contacts (M4, M5) - control box terminals (1, B4) - sliding motor terminals "D4" (in), "D3" (out) - control box terminals "B4", "2" - grounding "B23" - battery negative
The circuits of the other motors are the same as the sliding motors and will not be described again.
Power seat common fault detection
Fault 1: The power seat does not move and the adjustment fails.
If the power seat does not move and adjusts the failure, you can test it as follows:
1. Check the power supply circuit of the control box. Use a multimeter to measure the voltage of terminal "1" (positive) and body ground (negative). The normal value should be 12V (battery voltage). Otherwise, check the battery voltage, terminal "1" 25A fuse control box connector and battery to Is the harness between terminals "1" shorted or open?
2. Check the grounding circuit of the control box. Check the continuity between the terminal "2" and the grounding point "B23" with an electric resistance meter. Normally, it should be turned on. Otherwise, check whether the connection between the control box connector and the grounding point "B23" is firm.
3. Check the control box. Use the resistance meter to check whether the terminal "1" is electrically connected to the terminal "2" and each of the "N" and "R". It should be turned on under normal conditions. Otherwise, the control box should be replaced.
Fault 2: The power seat cannot move forward or backward.
If the power seat cannot move forward or backward, you can test it as follows:
1. Check the control box (B) switch and connect the wiring harness. Test the grounding of the connector terminal "D3" of the rail motor with the test lamp or LED, and press the control box forward switch "FORWARD" (connection terminal "B3"), the test light should be lit, otherwise it indicates The control box front switch is damaged and should be replaced; then, use the test lamp to check the connector terminal "D4" of the rail motor to the grounding of the vehicle body, and press and hold the control box back switch "BACK" (connection terminal "B4") The test lamp should be lit, otherwise it indicates that the control box is damaged to the rear switch and should be replaced. Finally, check the wiring continuity between terminals “D4†to “B4†and “D3†to “B3†with a multimeter. General Description M (285) harness disconnected or connected to the terminal, should be replaced or repaired.
2. Check the sliding motor. Check the sliding motor connector “D3†to “D4†with the test lamp, and press the controller forward and backward respectively, and the test lamp should be lit separately. Otherwise, the connector is not in good contact or the sliding motor is damaged. It should be repaired or replace.
Fault 3: The front end of the power seat does not rise vertically.
If the front end of the power seat does not rise vertically, you can test it as follows:
1. Check the control box switch and connect the wiring harness. First test the connector terminal of the front lift motor with test light or LED, and press and hold the control box down switch "DOWN" (connection terminal "B9"), the test light should be lit, otherwise the control box down switch is damaged. Should be replaced; then use the test light to check the circuit of the front terminal of the lift motor "F10" to the grounding point, press and hold the front switch "UP" (connection terminal "B10") on the front of the control box, the test light should be lit, otherwise Indicates that the front end of the control box is damaged and should be replaced. Finally, check the wiring continuity between terminals “F9†and “B9â€, “F10†and “B10†with a multimeter. If it is not conducting, it indicates “O†(275). The harness is broken or connected to the terminal and should be repaired or replaced.
2. Check the lifting motor. Check the front and rear lift motor connector terminals “F9†and “F10†with the test lamp, and press the control box up and down respectively to illuminate them separately. Otherwise, the connector may be in poor contact or the front lift motor may be damaged. replace.
Fault 4: The rear end of the power seat does not rise vertically.
If the rear end of the power seat does not rise vertically, you can test it as follows:
1. Check the control box (B) switch and connect the wiring harness. First test the grounding of the lifting motor connector terminal "E1" to the vehicle body with the test lamp, and press the down switch "DOWN" (connection terminal "B7") at the rear of the control box, the test light should be lit, otherwise it indicates control The rear end switch of the box is damaged and should be replaced; then check the grounding condition of the lifting motor connector terminal "E8" to the vehicle body with the test lamp, and press the rear end of the control box (B) to switch "UP" (connecting terminal B8) ), the test light should be lit, otherwise it indicates that the back switch of the control box is damaged and should be replaced; finally, use the multimeter to check the conduction of the wiring between the terminals "E1" to "B1" and "E8" to "B8". Conduction indicates that the N (215) harness is open or poorly connected to the terminal and should be replaced or overhauled.
2. Lift the motor after inspection. After testing with the test lamp, lift the motor connector terminals “E1†to “B8â€, and press the up and down switches on the back end of the control box respectively. The test lamps should be lit separately, otherwise the connector is not in good contact or the rear lift motor Damaged, should be repaired or replaced.
Fault 5: The power seat recliner cannot be rotated.
If the power seat recliner does not rotate, you can test it as follows:
1. Check the control box (B) switch and connect the wiring harness. First test the connector terminal "C5" of the recliner motor to the grounding condition of the vehicle body with the test lamp, and press the control box forward switch "FORWARD", the test light should be lit, otherwise the control box front switch is damaged, should Replace; then test the recliner with the test lamp, the motor connector terminal "C6" to the grounding condition of the vehicle body, and press the back button of the control box back to the rear switch "BACK" (B6 connected), the test light should be lit, otherwise it indicates The rear switch of the control box is damaged and should be replaced. Finally, check the continuity of the wiring between the terminals “C5†and “B5â€, “C6†and “B6†with a multimeter. If it is not connected, it indicates “I†(680). The harness is broken or connected to the terminal and should be replaced or repaired.
2. Check the recliner motor. Check the connector "C5" to "C6" of the recliner motor with the test lamp, and press the control box rear switch forward "FORWARD" and backward "BACK" respectively, the test light should be lit, otherwise the connector is indicated. Poor contact or damage to the recliner motor should be repaired or replaced.
Commutator Pump Motors,Used Electric Power Tools,Cable For Water Pump,Impeller For Water Pump
ZHEJIANG JIAGU ELECTRIC APPLIANCES CO. LTD , https://www.chinajiagu.com