I. Introduction
Starting today, we officially begin our Zigbee-related communication experiment. The protocol stack we're using is ZStack, specifically the TI ZStack-CC2530-2.3.0-1.4.0 version. You can also download it directly from TI's official website. Although the company provides its own protocol stack for the CC2530, as a beginner, there's no need to dive deep into the code itself. After all, Zigbee is a mature protocol, and the goal should be to learn how to use the protocol stack effectively in practical applications—such as smart furniture. I'm not sure if everyone feels the same, but I'll walk you through the principles and architecture of Zigbee communication.
2. ZStack Architecture
ZStack is structured into layers, each providing specific services to the layer above. These layers include the Data Service Entity, which handles data transmission, and the Management Entity, which manages other services. Each service entity offers an interface through a Service Access Point (SAP), and these SAPs perform their functions via service primitives.
ZStack follows the IEEE 802.15.4 and Zigbee standards, consisting of the Physical Layer, Medium Access Control (MAC) Layer, Network Layer, and Application Layer. The Physical Layer handles basic data transmission and reception, while the Network Layer ensures that nodes are connected and forms the core of Zigbee communication. The Application Layer is where we focus most of our attention, as it includes the application framework and ZDO (Zigbee Device Object). For more detailed information, you can refer to the official documentation. Now, let me explain how Zigbee works.
ZStack is designed with an operating system-like approach, using an event-driven round-robin mechanism and a dedicated Timer2 for timing. On the CC2530, Timer2 repeatedly triggers tasks such as data acquisition, transmission, reception, and display. Once all layers are initialized, the system enters low-power mode. When an event occurs, it wakes up, processes the event, and then returns to low-power mode. If multiple events happen at once, they are processed in order of priority. This architecture significantly reduces power consumption.
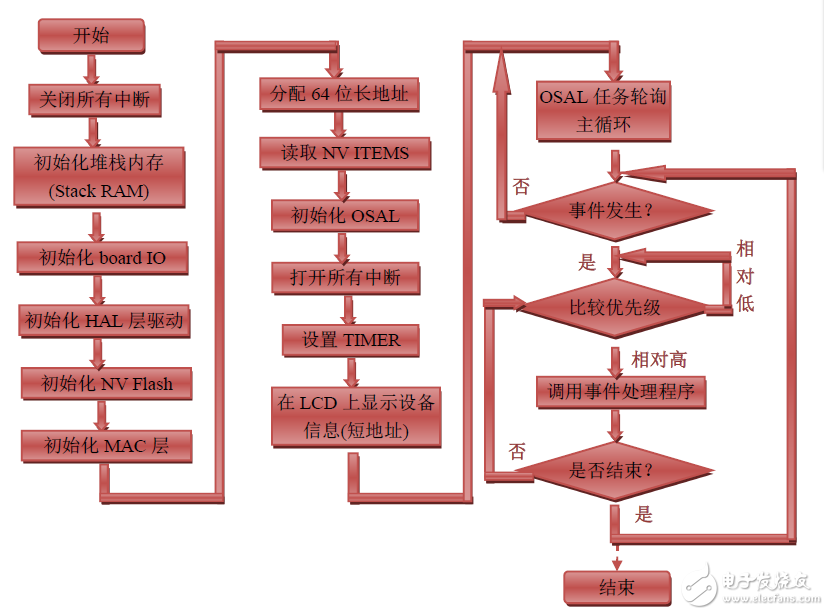
The main workflow of ZStack, as shown in the figure, involves six key steps:
(1) Disable all interrupts;
(2) Initialize the chip and its peripherals;
(3) Internal initialization of the chip;
(4) Initialize the operating system;
(5) Enable all interrupts;
(6) Start the operating system.
This is the general process for handling Zigbee tasks.
Code Analysis
The protocol stack code is extensive and complex, but the figure above gives a good overview.
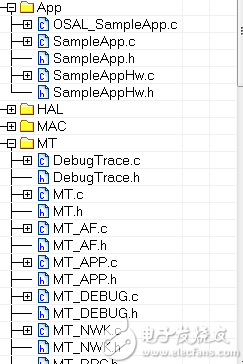
This is just a part of the entire code, so we don’t need to focus too much on the setup. Instead, we should concentrate on learning how to use it. The main file we will configure is SampleApp.c, which is used for application development. For different applications, we only need to modify this file and the related configuration files. It contains six important functions, which are essential for initializing user functions, handling events, managing keys, processing received data, and sending data. Let’s take a closer look at these six functions.
Void SampleApp_Init( uint8 task_id )
This function is used for initializing a task during the system startup. It should handle any necessary hardware or software setup, such as peripheral initialization, data table setup, and power management.
Uint16 SampleApp_ProcessEvent( uint8 task_id, uint16 events )
This is the event handler responsible for processing all registered events, including timers, messages, and custom events. It handles actions like button presses, data reception, and transmission. Developers can add their own events here, such as serial communication events.
Void SampleApp_HandleKeys( uint8 shift, uint8 keys )
This function is called when a key is pressed. It is triggered by the SampleApp_ProcessEvent function when the KEY_CHANGE case is executed. Here, you can define what each button does and assign specific tasks based on the key pressed.
Void SampleApp_MessageMSGCB( afIncomingMSGPacket_t *pkt )
This function manages incoming data. It determines the source device based on the cluster ID. Inside, there's a switch statement where each case corresponds to a specific cluster ID. You can define your own cluster IDs in SampleApp.h and add cases accordingly to handle different types of data.
Void SampleApp_SendPeriodicMessage( void )
This function is used to send data periodically, typically when the device is broadcasting. It's where you set the content of the data being sent.
Void SampleApp_SendFlashMessage( uint16 flashTime )
This function is used within the SampleApp_HandleKeys function. It’s rarely needed, so we won't go into detail here.
These six functions are commonly used in Zigbee projects. As a beginner, mastering them is sufficient to get started. First, transplant the driver and initialize the hardware. Then, after modifying these six functions, you can easily apply Zigbee in real-world scenarios. I've shared my experience here, but I encourage you to reach out and collaborate. This is just my personal insight, and I hope it helps you in your Zigbee journey.
Outdoor Cabinet Air Conditioner
Industrial Air Conditioner,Cabinet Heat Exchanger,Peltier Air Conditioner,Industrial Aircon
Guangdong Yuqiu Intelligent Technology Co.,Ltd , https://www.cntcetltd.com