First, the welding tool (a) electric iron. Soldering iron is the most commonly used welding tool. We use a 20W internal heating soldering iron. Figure 1. 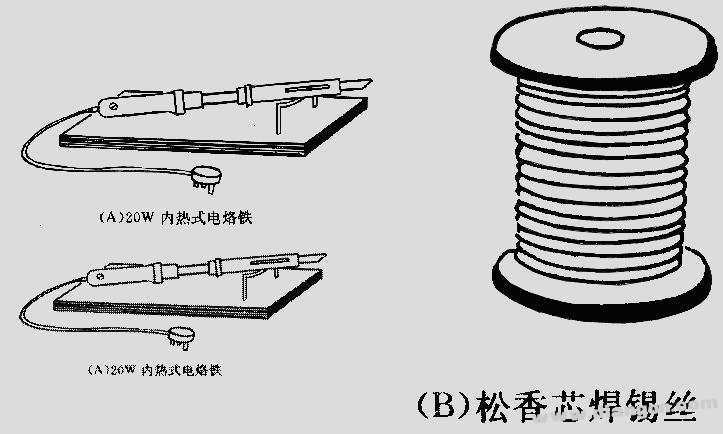 figure 1
Before using the new soldering iron, apply the fine sandpaper to brighten the soldering iron tip, heat it on the power, and apply the solder wire after the rosin is applied to the rosin, so that the soldering iron tip is evenly coated with a layer of tin. This will facilitate soldering and prevent oxidation of the surface of the tip. If the old soldering iron head is blackened by severe oxidation, it can be used to reduce the surface oxide by steel, so that it can be re-tinned after it is exposed to metallic luster.
The soldering iron should use 220V AC power supply, pay special attention to safety when using. The following points should be carefully done:
1. It is best to use a three-pole plug for the soldering iron plug. Make the casing properly grounded.
2. Before use, carefully check the power plug and power cord for damage. Also check if the tip is loose.
3. The soldering iron is in use and cannot be struck hard. To prevent falling. When there is too much solder on the tip, it can be wiped off with a cloth. Do not smash, to prevent burns.
4. During the soldering process, the soldering iron cannot be placed around. When not welding, it should be placed on the iron frame. Note that the power cord should not be placed on the tip to prevent the insulation from being burnt.
5. After use, cut off the power and unplug the power cord. After cooling, recharge the soldering iron back into the toolbox.
(b) Solder and flux are also required for solder and flux soldering.
1. Solder. For soldering electronic components, solder wires with a rosin core are generally used. This solder wire has a low melting point and contains a rosin flux, which is extremely convenient to use.
2. Flux. A commonly used flux is rosin or pine perfume (the rosin is dissolved in alcohol). The use of flux helps to remove oxides from the metal surface, which facilitates soldering and protects the soldering iron tip. Solder paste can also be used when soldering larger components or wires. However, it is corrosive and should be removed in time after welding.
(3) Auxiliary tools In order to facilitate the welding operation, needle-nosed pliers, tongs, tweezers and knives are often used as auxiliary tools. Students should learn to use these tools correctly. 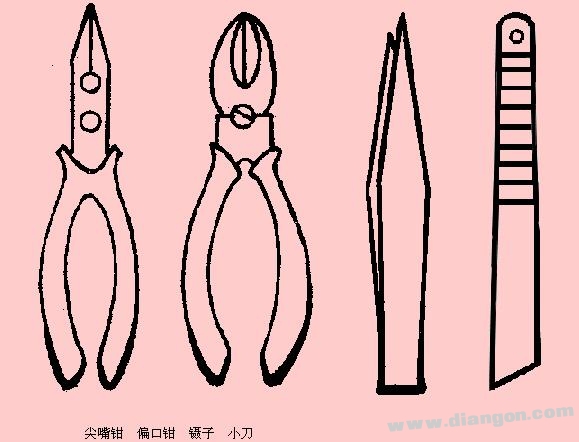 Figure 2. Auxiliary tool II, pre-weld treatment
Pre-weld processing should be performed on the component leads or the solder joints of the board before soldering (Figure 3).
(1) Removing the oxide layer of the welded part. A knives can be made from a broken saw blade. The oxide layer on the surface of the metal lead is scraped off to expose the lead to metallic luster.
2. The printed circuit board can be polished with a fine gauze paper and coated with a layer of rosin alcohol solution.
(2) Tin plating of components is tinned on the scraped leads. After the lead is rubbed into the rosin alcohol solution, the tin-coated hot tip is pressed onto the lead and the lead is rotated. The leads are evenly plated with a very thin layer of tin. Before the wire is welded, the insulation skin should be stripped and subjected to the above two treatments before it can be formally welded. If there are wires of multiple strands of wire, they should be screwed together and then tinned.
Third, welding technology
After the pre-weld treatment, the welding can be formally carried out.
(1) Welding method (see Figure 3). "
1. Hold the soldering iron on the right. The left hand holds the component or wire with a needle-nose pliers or tweezers. Before soldering, the soldering iron should be fully preheated. Tin on the tip of the tip, that is, a certain amount of solder.
2. Place the tip of the tip close to the solder joint. The soldering iron is at an angle of approximately 60 ° C to the horizontal. In order to facilitate the flow of molten tin from the soldering iron tip to the solder joint. The time that the tip stays at the solder joint is controlled for 2 to 3 seconds. 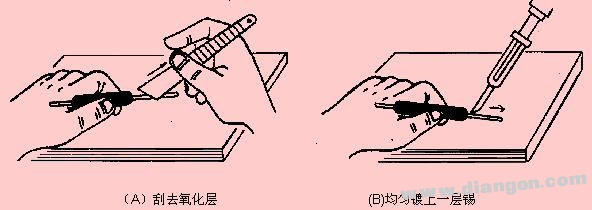 Figure 3. Pre-weld treatment
3. Lift the tip. The left hand still holds the component. The tin at the solder joint is cooled and solidified before the left hand can be released.
4. Use a pair of tweezers to turn the lead and make sure it is not loose. Then use a pair of jaws to cut off the excess leads. 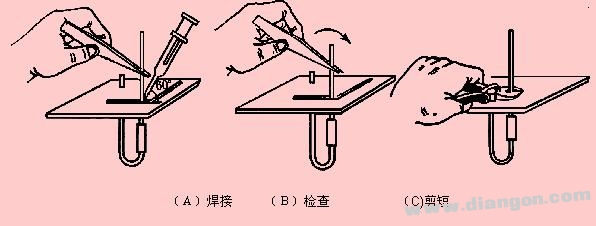 Figure 4. Welding (2) Welding quality When welding, ensure that each solder joint is welded firmly and in good contact. To ensure the quality of welding.
(A) should show that the tin point is bright, smooth and burr-free, and the amount of tin is moderate. The tin and the soldered material are fused firmly. There should be no false or false welds.
The virtual soldering is that only a small amount of solder is soldered at the solder joint, resulting in poor contact, and the time is broken. Sham soldering means that the surface seems to be welded, but it is not actually soldered. Sometimes, the lead can be pulled out from the solder joint. These two situations will bring great difficulties to the debugging and overhaul of electronic production. These two situations can only be avoided after a large number of serious welding practices. 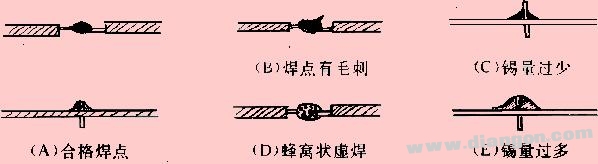 Figure 5
When soldering a circuit board, be sure to control the time, too long, the board will be burnt, or the copper foil will fall off. When removing components from the board, the soldering iron tip can be attached to the solder joints. After the tin on the solder joints is melted, the components are pulled out.
Skill training welding practice (1)
Objective To practice direct welding of components by performing pre-weld processing on components.
Equipment 20W internal electric soldering iron, red and black soft core plastic wires, 2 battery cases, 2 squid clips, 100 ohm fixed resistors, 470 ohm potentiometers, and 1 LED.
Steps to solder the battery basin:
1 Strip the plastic outer skins of the four flexible wires at about 1 cm each. After scraping with a knife, the multi-strand core wires are screwed together and tinned.
2 Squeeze the positive and negative electrode pads of the battery case with a knife and tin. The two squid clip wire is polished and tinned.
(2) One red wire is welded, one end is welded to the red squid clip, and the other end is welded to the positive electrode tab of the battery case.
Take one black wire, one end is welded to the black squid clip, and the other end is welded to the negative electrode tab of the battery case.
(3) Check the welding quality 1 Whether the solder joints are firm, whether there is virtual welding or false welding. Whether it is smooth yuan glitch.
2 Re-weld the unqualified solder joints.
2. Welding circuit (welding according to Figure 3 - 4).
(1) Pre-weld treatment The two pins of the resistor, the potentiometer pin soldering piece, and the LED pin are polished with a knife and tinned. ,
(2) Solder 1 Solder one end of the resistor to the solder tab on the potentiometer pin side.
2 Solder the soldering piece in the middle of the potentiometer pin to one wire.
3 Solder the other end of the wire to the negative level of the LED.
4 Weld the positive electrode of the LED to the other wire.
(3) Check the welding quality 1 Whether the solder joints are bright and smooth, with or without false soldering and solder joints.
2 Re-weld the failed solder joints.
Note: When soldering the LED, the time is short, and the needle tip is used to clamp the root of the pin to facilitate heat dissipation. Clip the squid clips on the battery box leads to the ends of the soldered circuit (pay attention to positive and negative) and observe the illuminating condition of the LEDs. Rotate the potentiometer to make the LEDs moderately bright.
(4) After soldering, remove the soldering iron plug and wait for it to cool before retracting the toolbox.
Skill training welding practice (2)
Objective To practice pre-weld processing of components and practice soldering circuit boards.
20 watts of internal heat-type soldering iron, 1 printed circuit board, 10/8 watts of small resistors.
step 1. Pre-weld treatment (1) After the printed circuit board copper foil is polished with fine sandpaper, uniformly apply a layer of rosin alcohol solution on the copper foil surface. In the case of a soldered printed circuit board, the solder holes should be punctured (after soldering the solder joint with an electric soldering iron, the solder hole is punctured with a hot pin).
(2) After the 10 resistor pins are scraped one by one with a knife, they are respectively tinned.
2. Solder (1) Insert the resistor into the small hole of the printed circuit board. Insert from the front (without copper foil). The resistor pins are left 3 to 5 mm.
(2) On the reverse side of the board (with copper foil side), solder the resistor pins to the copper foil and control the soldering time to 2 to 3 seconds. If you are going to repeat the exercise, you can not cut the pin. Ten resistors were soldered one by one on the printed circuit board.
3. Check the welding quality of 10 solder joints, which meet the welding requirements? Re-weld the failed solder joints.
4. Remove the resistors one by one. Unplug the circuit iron power plug and pack the equipment.
Thinking and practice When welding components and boards, there are more equipment. In order to facilitate the bombing and avoid accidents, place the tools and components in a fixed position on the table. How do you plan to place the soldering iron, tools and components? Try it, is it convenient to operate? Develop good habits of ordering equipment.
2. When the soldering iron is used for a long time, there will be black oxide and residual solder slag on the soldering iron tip, which will affect the subsequent soldering. Think about how to constantly clean the tip to keep it working.
VOZOL BAR Vapes are so convenient, portable, and small volume, you just need to take them
out of your pocket and take a puff, feel the cloud of smoke, and the fragrance of fruit surrounding you. It's so great.
We are China leading manufacturer and supplier of Disposable Vapes puff bars, vozol bar disposable vape,vozol 1200 puff bar vape,
vozol bar disposable pod, and e-cigarette kit, and we specialize in disposable vapes, e-cigarette vape pens, e-cigarette kits, etc.
vozol bar disposable vape,vozol 1200 puff bar vape,vozol bar disposable pod,vozol bar vape 1200 puffs,vozol bar vape lush ice
Ningbo Autrends International Trade Co.,Ltd. , https://www.mosvapor.com